Sales Invoices
- Home
- Sales Invoices
Sales Invoices
Invoices / Credit Notes
List of Sales Invoices and Credit Notes, which may be customised, are shown together with a filter and a tool bar above. Invoices created from Shipments are also listed here.
- New. Create a new sales invoice / credit note.
- Edit. Edit an existing sales invoice or a credit note. Whilst an invoice is being edited, it is ‘locked’ and can not be edited or posted by another user.
- View. View an existing sales invoice or credit note. The record is not ‘locked’ and can be edited / posted by another user on the network. Options for saving any changes are disabled whilst viewing a record.
- Copy. Copy an existing record (invoice or a credit note) as a new invoice. This feature is handy when for repeat invoices that you may need to create for shipments or services that you provide repeatedly.
- Flip. As copy, but changes the invoice type to the opposite, for example, flipping a invoice will create a credit note and vice versa. This is handy for when you may want to credit part of an existing invoice; simply copy the invoice as a credit and delete items you do not wish to credit and amend quantities for items that are to be partly credited. If you create a credit note from an invoice that was created from the shipments then you will have the option to credit the back into stores when its posted.
- Post. Post selected invoices and credit notes. If a selected record has already been posted, then it is ignored i.e. not processed. This process transfers financial details to the accounts ledger i.e. the customer account, debtors and tax account balances are updated.
- Print. Print selected invoices / credit notes.
- List. Print selected invoices / credit notes in a list.
- Repeat. Setup selected invoice or credit note to be repeated at a specified interval or date. Invoices to be repeated may contain some date related macros for the item desctiption. To use the macros, enter the item details, including the macro strings, listed below, in the invoice items column, Template. A macro is a short non-case sensitive text with a leading and trailing % character. In addition, the macro text can have a trailing +/- sign followed immediately by an integer number and an optional 1 character (d = day, w = week, m = month, y = year) to add or subtract the appropriate number of days / weeks / months / year. If the optional single character is included after the number, then the date is amended appropriately BEFORE the makro is expanded. For example, %da+3% %day+2m% %month+2% %year+2m% will add 2 months to the dates in both instances before expanding the macros; if the date is 11/11/2019 this example will add 2 months to give 11/01/2020 and the macro will be expanded to 11 Sat January 2020. Do not include any spaces within the two % signs.
Macro Examples Note da %da%, %da+1%, %da-3% Will be expanded to day of the month (01 – 31), based on the date that the repeat event is actioned. day %day%, %day+1%, %day-3% Day of week (Mon – Sun). dow %dow%, %dow+1%, %dow-3% Day of week (Monday – Sunday). wk / week %wk%, %wk+1%, %wk-3% Week of the Year (01 – 52). mm / mt %mm%, %mm+1%, %mm-3% Month (01 – 12). mth %mth%, %mth+1%, %mth-3% Month (Jan – Dec). month %month%, %month+1%, %month-3% Month (January – December). yy / yr %yy%, %yy+1%, %yy-3% 2-digit Year e.g. 19 for 2019. yyyy / year %yyyy%, %yyyy+1%, %yyyy-3% 4-digit Year e.g. 2019. - Refresh. As others using the system can make changes to the Quotes/Orders etc, this will refresh the list to get the latest changes.
- Delete. This button is visible only if the option to allow invoices to be deleted is enabled. Using this option you can disable the ability to delete invoices and credit notes alltogether or allow invoices that have not yet been posted to be deleted or allow only invoices that have been posted to be deleted or allow both posted and un-posted invoices to be deleted. N.B. The user MUST have Sales Invoice Post priviledges to be able to access the delete functionality.
You will notice that in the list, some column contains Hyperlinks, pressing and holding the <CTRL> key whilst left clicking on the appropiate will open the corresponding item in View mode. For example, in the image above, the first listed order is for ‘CONJUR’, activiting the Hyperlink for the A/C Ref, will open the Customer Record for ‘CONJUR’ in view mode.
Invoice / Credit Note Record
This screen allows you to enter all relevant details about your invoice or credit note, the screen is split into multiple tabs categorising the details into smaller easier to follow sections, there are other tabs for the billing and delivery addresses, delivery charges, for nominal account and notes, currency details.
There are several buttons on the toolbar at the top, a brief overview of their functionality is detailed below:
- Save. Save any changes made to the current invoice or credit note. This button is disabled if the invoice or credit note was opened in view mode.
- Cancel. Cancels any changes made to the current invoice or credit note. This clears the form where you can either enter a new invoice or credit note or load an exisitng record by entering the appropriate invoice / credit note number. Leaving the A/C Ref field blank and clicking Cancel for a second time will close the form.
- Print. Allows you to print the invoice or credit note using a user definable template.
- Close (not pictured). Close the invoice / credit note screen. A prompt will appear asking if you want to save before closing.
Click on the appropriate tab to define or view the details.
If the invoice was generated through Shipments, the details will have been copied from the actual Sales Order.
Details
- Type. Are you creating a Invoice or a Credit Note? Press ‘I’ for Invoice or ‘C’ for Credit Note or select from the list by click on the arrow.
- Invoice No. If you want to create a new invoice or credit note, leave this as ‘NEW’. Entering a valid Invoice / Credit Note number will fetch details from the matching record.
- A/C Ref. The account reference of the customer the invoice or credit note is been created for. Leaving the field, the system will go and get the details of the customer with the matching reference.
- Date. Date the invoice or credit note was placed / entered on to the system.
- Order No / GDN No. If this invoice was generated by Shipments, the corresponding Order Number and GDN Number will be shown here.
- Sales Person. Enter the Name or initials of the person who is entering the invoice or credit note.
- Cust Order No. If your customer supplies a reference for each of theirs orders, you can enter this information here.
- Discount %. Percentage Discount to be applied to the invoice or credit note.
- Net, Carriage, Tax etc. Shows the Invoice Totals in a logical format. If the currency of the customer is a foreign currency, a second column of figures will show, showing the totals in the customer currency.
Setting the Type to Credit Note changes the tab bar background colour to pink as a easy to see indication that your modifying a credit note,
Addresses
- Company. The name of the Company the invoice or credit note is for.
- Select Address. You can select an address from the Customer’s Address book for the both the Billing (left hand address) and the Delivery Address (right hand address).
- Delivery To. If the order is being delivered to another company other than who the order is for, you can enter the Company Name here.
- Address. Enter the Billing (left side) and/or the Delivery (right side) addresses.
- Tel. The contact number for the billing contact for the invoice or credit note.
- Courier. Here you can select which Courier the order will be shipped by. This list is customisable via the Lists options in Configuration.
- Consignment Ref. You can record the consignment note of the shipemt(s) in this field.
- Boxes. The number of boxes for the shipment.
- Carriage.
- Nominal Code. The Nominal Code for Delivery Charge.
- Department. If you use Departments, the department code for Deliveiries
- Tax Code / Rate. Enter the Tax Code that is applicable for the delivery charge. The field to the right will show the current tax rate for the selected Tax Code. The Tax Rate can be manually changed here and will only affecting this specific order.
- NoTC. Nature of Transaction Code.
- Terms of Del. Terms of Delivery.
- Net. The net amount to be charged for delivery.
- Tax. The tax amount, calculated automatically.
- Gross. Total Delivery Charge (Net + Tax), also calculated automatically.
Nominal & Notes
- Nominal Code. Set the Global Nominal Code for the invoice. Clicking on the button to the right of the field will set the Nominal Code for all the items on the invoice to the currently selected Nominal Code.
- Department. If you use departments, which department to assign this invoice to.
- Tax Code / Rate. Set the Global Tax Code for the invoice. The field to the right will show the current rate for the selected Tax Code. This can be changed here if required. Clicking on the button to the right of the Tax Rate field will set the Tax Code for all the items on the invoice to the currently selected Tax Code.
- Bank Account. Enter Account Reference any monies will be paid into/against.
- Payment Type. The payment type to be used when paying for the invoice.
- Payment Ref. Payment Reference.
- Paid Amount. Pre-paid amount.
- Notes 1 – 3. You can enter three lots of notes. The labels (1, 2, 3) for each of the notes fields can be changed under Sales in Configuration.
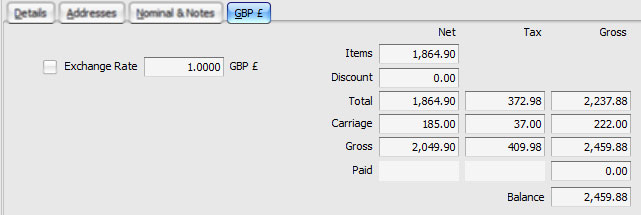
Currency
This tab shows a breakdown of the invoice totals including Net, Tax, Carriage, Discount, pre-payment and Gross values. By default, these would be shown in the Base Currency. If you are running a multi-currency system and the current customer is a foreign currency customer, checking the checkbox will show the values in the customer currency.
Checking the checkbox also enables you to be able to change the exchange rate used in the calculations. If the newly inputted exchange rate is different to the system exchange rate, you are asked if you want to update the system with the new rate.
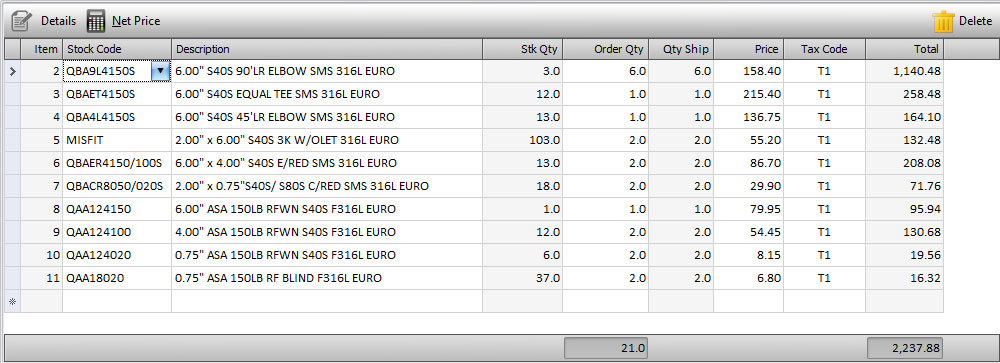
Items List
There are several buttons on the toolbar above the item grid, a brief overview of their functionality is detailed below:
- Details. View the selected item in more detailed view.
- Net Price. Re-calculate the Price by dividing the current price by the order quantity.
- Delete. Delete the selected item(s).
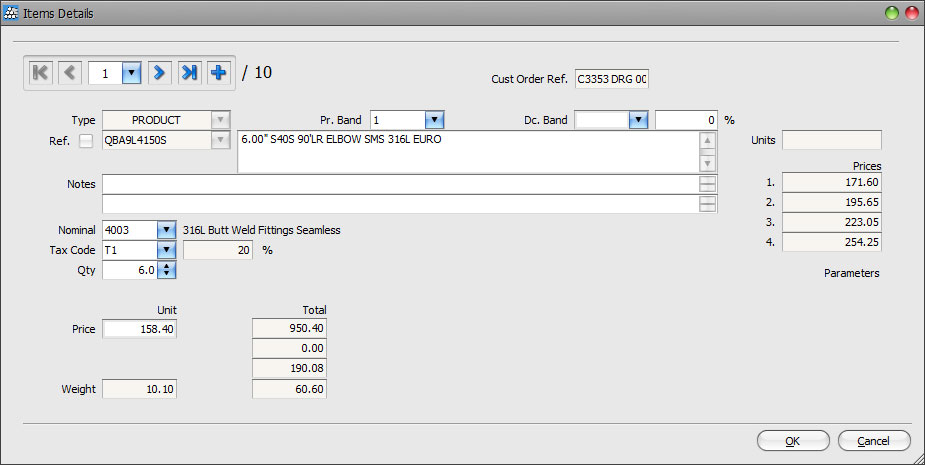
Details
Clicking the Details button above, with one of the items highlighted will open the currently selected item in a more detailed screen. You can use this to modify the item if you dislike the idea of entering information in a grid or if you want to edit details that are not shown on the grid.
By using the navigation buttons in the top left corner, you navigate through the exisiting items on the invoice or create a new entry from here.
Index | Sales Ledger | Sales Orders | Shipments | Sales Invoices


