background image

Ice Ledger

Settings: Configurations

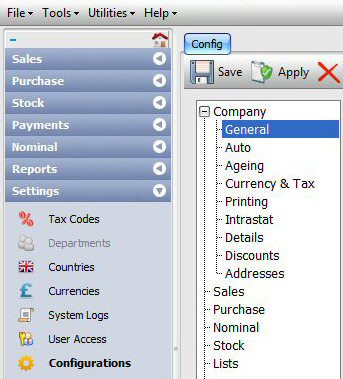
System Configurations is the last option in the the Settings menu and allows various options to be set.

Configuration Menu


Index | Sales Ledger | Purchase Ledger | Stock Control | Payments | Nominal Ledger | Reports | Configurations

  Top | General | Auto | Ageing | Currency & Tax | Intrastat | Sales | Purchase | Nominal | Stock | Stock Pick | Email | User | Workstation | Text Editor

Company : General

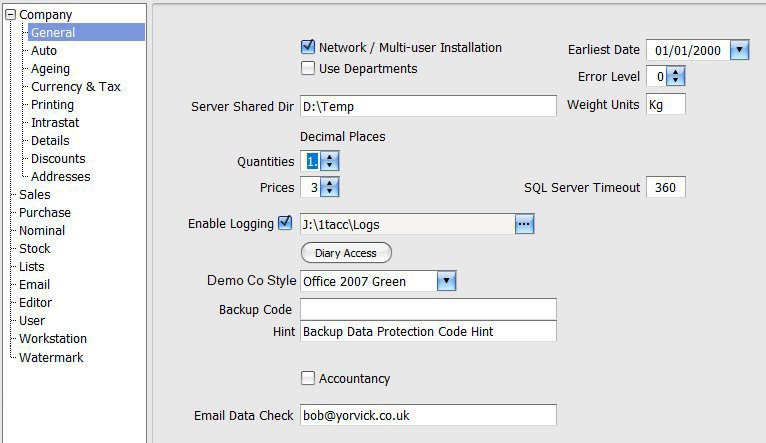
Configurations: General


  • Network / Multi-user Installation: If this is a multi-user, network installation, then this box should be checked. If you are not sure, then leave this checked. For a single user, stand - alone installation i.e. the accounts system is used on a single computer only then removing the tick in this option will make the system run slightly faster as record locking functionality (needed for multi-user installation) is disabled.
  • Use Departments: If you want to enable departments feature for various screens then tick this option.
  • Decimal Places: You can define the number of decimal places that the system should use for the different types of figures/
    • Quantities: Set the number of decimal places the system should use for all quantity based figures.
    • Prices: Set the number of decimal places the system should use for all price based figures.
    • Rounding: See Quantities, Prices and Rounding
    • Enable Logging: Enable / disable debug logging in:
      • Sale Order Processing - saving and stock allocation. J:\1Tacc\<user>_salesorder.txt

Index | Sales Ledger | Purchase Ledger | Stock Control | Payments | Nominal Ledger | Reports | Configurations

  Top | General | Auto | Ageing | Currency & Tax | Intrastat | Sales | Purchase | Nominal | Stock | Stock Pick | Email | User | Workstation | Text Editor

Company : Auto

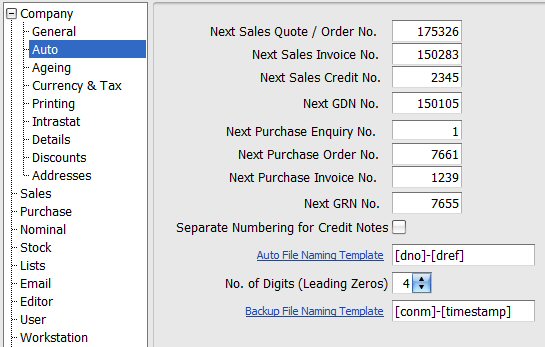
Configurations: Auto Settings


  • Next sales quote / order no: Sales order number to be assigned to the next sales order / quote.
  • Next sales invoice no: Sales invoice number to be assigned to the next sales invoice.
  • Next sales credit no: Sales credit note number to be assigned to the next sales credit note. If you wish to use separate, independent numbering for sales invoices and credit notes, then make sure the option, Separate Numbering for Credit Notes, below is checked.
  • Next purchase order enquiry no: Enquiry number to be assigned to the next purchase order enquiry.
  • Next purchase order no: Purchase order number to be assigned to the next purchase order.
  • Next purchase invoice no: Number to be assigned to the next purchase invoice.
  • Next purchase Invoice:
  • Separate Numbering for Credit Notes: Check this option if you want the system to assign numbers to sales credit notes, independent of sales invoices.
  • Next Purchase Invoice for Ref Column:
  • Auto File Naming Template: When you print documents to files (e.g. creating PDF files), you can get the system to automatically assign file names to each printed document. You can enter any valid file name characters (0-9, a-z, -_!() etc..). In addition you can enter a number of macros that will be replaced with details from the system and the document being printed (see Macros, below).
    • No of Digits (Leading Zeros): You can use the macro, [dno] (see below) as part of the file naming template. If you do, you can also specify the number of digits for the document number. If this is greater than the actual number of digits in the document number, then the number is prefiixed with zeros to give required number of digits. For example, for an invoice number of 1234 and this Digits parameter set to 6 then the number will be prefixed with 2 leading zeros to give an 6-digit number, 001234.
  • Backup File Naming Template: When you backup company data, a backup file is created in the designated (see Backup Dir under Workstation section) folder. The name of the file is created automatically using this template. As with the auto file naming template, above, you can enter any valid file name characters and macros (see Macros, below).

Macros

These macros, enclosed in square brackets, may be used in any combination:
  • General Macros:
    • [conm]: Short abbreviated company name, selected at startup.
    • [coname]: Full company name of the company selected at startup.
    • [pc]: PC / computer or workstation ID.
    • [usr]: User Login ID.
    • [name]: Customer / supplier name or selcted stock item description.

  • Document Related Macros:
    • [dda]: Two digit, day of the month, derived from the document date e.g. sales order / invoice date.
    • [ddt]: Document date as ddmmyyyy where dd is the day, mm the month and yyyy the 4-digit year.
    • [dmt]: Two digit month, derived from the document date..
    • [dmth]: Three character month (e.g. Jan, Feb, Mar etc..), derived from the document date.
    • [doc]: Two character document type e.g. so for a sales order; si for a sales invoice; po for purchase orders; gr for goods received notes; pi for purchase invoices etc.. [N.B. Email templates are loaded from folder names derived from this the document type: <TemplatesFolder>\Emails\<DocumentType>\ e.g. J:\1TAcc\Templates\Emails\SO for sales order templates.]
      • cu: Customer
      • grn: Goods Received Notes
      • pe: Purchase Enquiries
      • pi: Purchase Invoices
      • po: Purchase Orders
      • sh: Shipments
      • si: Sales Invoices
      • so: Sales Orders
      • sq: Sales Quote
      • stk: Stock Records
      • su: Suppliers
    • [drep]: Print report type:
      • cu: Customer Details
      • cul: Customer List
      • dn: Delivery Note
      • dnl: Delivery Note List
      • grn: Goods Received Note Details
      • grnl: Goods Received Note List
      • pe: Purchase Enquiry Details
      • pel: Purchase Enquiry List
      • pi: Purchase Invoice Details
      • pil: Purchase Invoice List
      • po: Purchase Order details
      • pol: Purchase Order List
      • sh: Shipment Details
      • shl: Shipment List
      • si: Sales Invoice Details
      • sil: Sales Invoice List
      • so: Sales Order Details
      • sodn: Sales Order Delivery Note
      • sopl: Sales Order Picking List
      • sol: Sales Order List
      • stk: Stock Record Details
      • stkl: Stock List
      • su: Supplier Details
      • sul: Supplier List
    • [dtd]: Similar to [ddt] but in reverse i.e. yyyymmdd.
    • [dyy]: Two digit year, derived from the document date.
    • [dno]: Document number e.g. sales order / invoice number. You can prefix the number with leading zeros to get a number with specified number of digits - see No of Digits, above.
    • [dref]: Document account reference e.g. customer / supplier account reference etc..
    • [dyyyy]: Four digit year, derived from the document date.

  • Current Date and Time Macros:
    • [date]: Current date (yyyymmdd)
    • [da]: Current day day of month (01 - 31).
    • [etad]: Current date in reverse format (yyyymmdd)
    • [hr]: Current time - hours (00 - 24).
    • [mn]: Current time - minutes (00 - 59).
    • [mt]: Current date - month (01 - 12).
    • [mth]: Current date - month as a 3 character string (jan, feb etc..).
    • [time]: Current time (hhmm).
    • [timestamp]: Current date and time (yyyymmdd_hhmm).
    • [yy]: Current date - year (00 - 99).
    • [yyyy]: Current date - year as a 4 digit number.

Example: When printing a sales invoice no, 2345 for a customer with account reference of XYZ789 and invoice date of 23/03/2014 and the following naming template: [doc]_[no]-([ref]_[td]) would create the following file name: si_2345-(xyz789_20140323). If the number of digits were set to 6, the the file name would be as follows: si_002345-(xyz789_20140323).

Index | Sales Ledger | Purchase Ledger | Stock Control | Payments | Nominal Ledger | Reports | Configurations

  Top | General | Auto | Ageing | Currency & Tax | Intrastat | Sales | Purchase | Nominal | Stock | Stock Pick | Email | User | Workstation | Text Editor

Company : Ageing

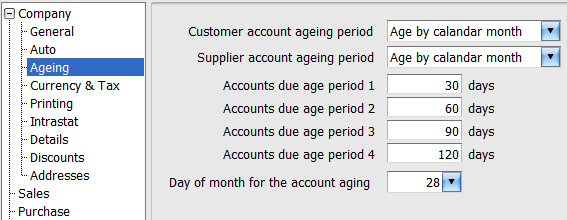
Company accounts may be aged (i.e. how long customers have owed you money for and how long you have owed money to your suppliers) in a number of ways.

Configurations: Period Ageing


  • Customer account ageing period: You can analyse the duration that customers have owed mobey by Calandar Month, Defined Period Days (see below) or Month Following transaction.
  • Supplier account ageing period: Independently of customer acount ageing, supplier accounts may similarly be aged.
  • Account due age period 1: If ageing is selected to be by defined peiods, the period 1 will be deemed to be any money that is either owed or owing for zero and the number of days specified here.
  • Account due age period 2: Similarly, period 2 is for debt falling beyond period 1 and the number of days defined here.
  • Account due age period 3: As periods 1 and 2 but for period 3.
  • Account due age period 4: As periods 1 - 3 but for period 4.
  • Day of month for the account ageing: Day of the month (1 - 30) that customer and supplier accounts should be aged.

Index | Sales Ledger | Purchase Ledger | Stock Control | Payments | Nominal Ledger | Reports | Configurations

  Top | General | Auto | Ageing | Currency & Tax | Intrastat | Sales | Purchase | Nominal | Stock | Stock Pick | Email | User | Workstation | Text Editor

Company : Currency & Tax

Company accounts may be aged (i.e. how long customers have owed you money for and how long you have owed money to your suppliers) in a number of ways.

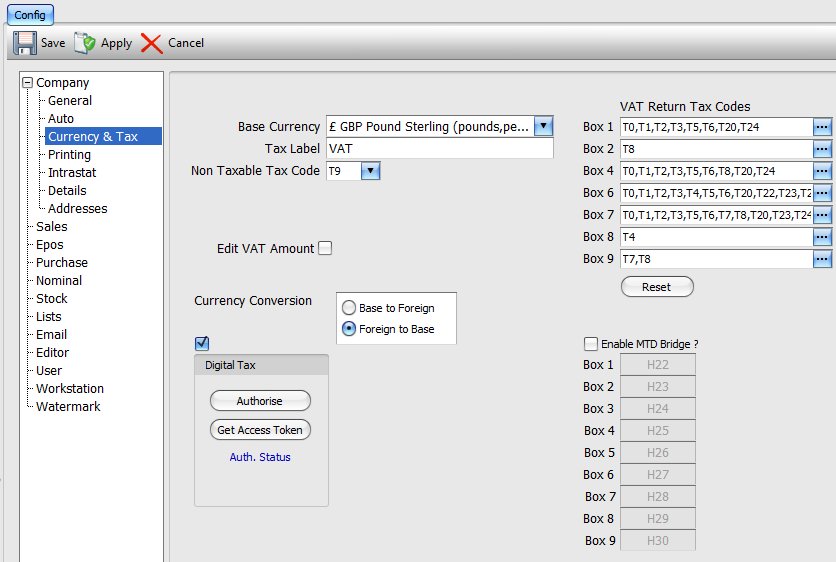
Configurations: Currency


  • Base Currency: You can select the currency that your company trades in. This can only be selected or set at the start, before any financial transactions are recorded.
  • Tax Label: Typically set to VAT but you can choose a different label for the local tax, should you wish.
  • Non Taxable Tax Code: Select a tax code that should be used for non-taxable / exempt transactions.
  • Edit VAT Amount: If selected, you will be allowed to amend the calulated VAT amount.
  • Multi Currency: Tick this box if your company trades with customers or suppliers in a currency that is different from the base currency, selected above.
  • Edit Exchange Rate: Tick this box if users are allowed to edit foreign currency exchange rates.
  • Currency Conversion: When dealing with foreign currency, you have the option of either calculating foreign currency value from the base currency and exchange rate or the system can calculate the base currency value from the foreign currency and exchange rate.
  • VAT Return Tax Codes: Enter a comma delimited list of tax codes into the nine fields (Box 1 - Box 9) that represent the appropriate boxes on the VAT return. Each tax code represents the transaction types that are to be collated for the different VAT return box. If you have made a mistake or are not sure of what should be entered into these fields then you can use the Reset button to reset the values in these boxes back to their original values.
  • Digital Tax: If you wish to submit your VAT returns digitally to the HRMC directly from within Ice Ledger then enter a tick in this box. Before you can submit VAT returns digitally, you MUST:

    1. Have a Government Gateway login for your business. If you do not have one then you can create a new account by visiting the HMRC website.
    2. Sign your business up for Making Tax Digital for VAT. After signing up, you will have to wait for a confirmation email from HMRC.
    3. Once you have completed the above 2 steps, have received the confirmation email and have your login credentials to hand, tick the option for Digital Tax to continue.
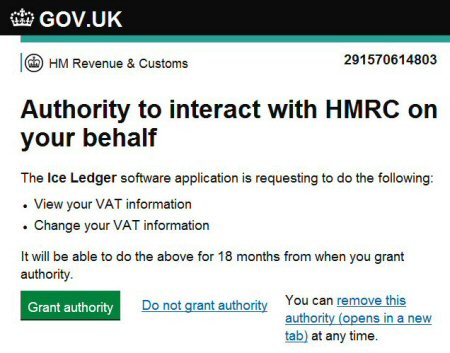
    • Authorise: Click this button and you will then be automatically directed to the HMRC web portal. Follow the on screen instructions and enter your business login credentials. This will lead you to a page similar to the one below.

      Authority to interact with HMRC on your behalf


      Here, you have the options to either Grant or Deny Authority. Granting Authority will allow you to submit your VAT returns using Ice Ledger. You can repeat this process at any time to revoke authority at which point you will no longer be able to submit VAT returns using Ice Ledger.
       

    • Get Access Token: Once access has been granted, an access token is require to submit a VAT return. This access token is valid for a period of 4-hours. Ordinarily, you will not need to obtain an access token as the system does this automatically prior to you submitting a VAT return.
  • Enable MTD Bridge: Even if you are not using Ice Ledger as your company accounting software, you can use its MTD bridging facility to submit your VAT to HMRC. Simply enable this option to allow you to import your VAT figures from a spreadsheet. The spreadsheet can be in any format. You just need to make a note of the cell-references that contain the figures for the different VAT Boxes 1 - 9. For more details, on using the MTD bridging option, search for Ice Ledger on YouTube and watch the short video on MTD Bridge.

Index | Sales Ledger | Purchase Ledger | Stock Control | Payments | Nominal Ledger | Reports | Configurations

  Top | General | Auto | Ageing | Currency & Tax | Intrastat | Sales | Purchase | Nominal | Stock | Stock Pick | Email | User | Workstation | Text Editor

Company : Printing

Index | Sales Ledger | Purchase Ledger | Stock Control | Payments | Nominal Ledger | Reports | Configurations

  Top | General | Auto | Ageing | Currency & Tax | Intrastat | Sales | Purchase | Nominal | Stock | Stock Pick | Email | User | Workstation | Text Editor

Company : Intrastat

Index | Sales Ledger | Purchase Ledger | Stock Control | Payments | Nominal Ledger | Reports | Configurations

  Top | General | Auto | Ageing | Currency & Tax | Intrastat | Sales | Purchase | Nominal | Stock | Stock Pick | Email | User | Workstation | Text Editor

Company : Details

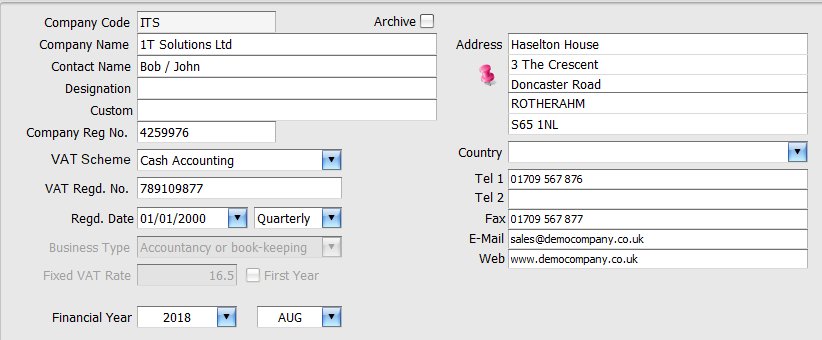
Company Details


  • Company Code: This is the short name given to the company when the company was first created and cannot be changed.
  • Company Name: This is your company name and may be changed at any time.
  • Contact Name: Name of the main person to contact at your company.
  • Designation: Job description or title of the named contact person, above..
  • Company Reg No: If the company is registered with Companies House, you can enter your company registration number here.
  • VAT Scheme: If you are registered for VAT, you can select the VAT scheme that you are on. You have a choice of:
    • Not VAT Registered.
    • Standard VAT Scheme. This is when you calculated your VAT returns based on sales & purchase invoices.
    • Cash Accounting. This is when your VAT returns are based on monies received and payments made.
    • Flat Rate. This is when you are a small business, operating in a specific industry. If you select this option, then you will be able to specify:
      • Business Type. Select your appropriate industry from the drop down list.
      • Fixed VAT Rate. This is set automatically when you select your industry type.
      • First Year. If this is your first year of trading, currently the HMRC allows an additional 1% discount.

      These options are purely for your convenience and you are STRONGLY ADVISED to make sure that the actual fixed rate that is applicable is the correct figure for the VAT scheme that you are on.

      You can read more about this and other VAT schemes on the HMRC website.
  • VAT Regd. Date: Date that the company was registered for VAT. This option is enable only if the previous option, VAT registered is ticked.
  • Period: To the right of the VAT registered date is a dropdown list that you use to specify how often (monthly, quarterly or annually) you submit your VAT returns.

    See Also: MTD - Making Tax Digital

  • Financial Year. Select the year and month that your company current financial tear starts.
  • Archive. The system allows you to create archives of your company data. For example, before you carry out your year end data processing, you may want to archive your data so that you can run reports retrospectively. With this option ticked, the company data is treated as an archive and you are prohibited from making any changes.
  • Address. You can enter your company address and contact details here. These are used by system default reports.

Index | Sales Ledger | Purchase Ledger | Stock Control | Payments | Nominal Ledger | Reports | Configurations

  Top | General | Auto | Ageing | Currency & Tax | Intrastat | Sales | Purchase | Nominal | Stock | Stock Pick | Email | User | Workstation | Text Editor

Sales

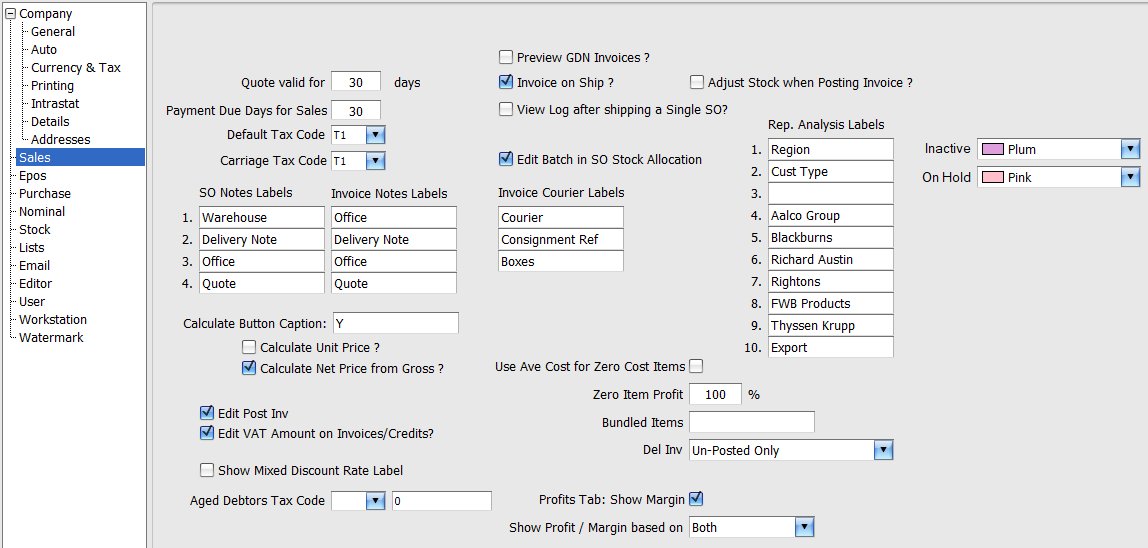
Configurations: Sales Ledger


  • Quote Valid For: Default value for the number of days that sales quotes are valid.
  • Payment Due Days for Sales:
  • Default Tax Code:
  • Carriage Tax Code:
  • SO Notes Labels 1 - 3: These are labes used in the Sales Orders Nominal & Notes tab for the 3 different notes.
  • Invoice Notes Labels: As above, for SO, these are labels for notes in the Sales Invoices Nominal & Notes tab for the 3 different notes.
  • Invoice Courier Labels: These are labels for the 3 courier (shipping company) related fields in the Sales Order and Sales Invoices Address tabs.
  • Calculate Button
    • Caption: You can define the text that appears to the right of the calculator button in Sales Order screen, just above the items list, on the right. You may use an ampersand, '&' character as part of the caption to designate a hot key.
    • Calculate Unit Price: If this option is ticked then the calculator will determine the unit price (current price entered in the item price price column divided by the quantity) of the currently selected item.
    • Calculate Net Price from Gross: If this is ticked, then the system will assume the price entered for the item includes VAT and will calculate the net price, taking into account the selected item's tax code.
  • Edit Post Inv: Check this option if you want to be able to edit the non-financial details, such as the address, in the
  • Edit VAT Amount on Invoices/Credits?:
  • Preview GDN: Preview the Goods Delivery screen when sales orders are shipped ?
  • Invoice on Ship: Generate invoices, for shipped items, automatically when items are shipped.
  • Group Items When Posting Invoices: When invoices are posted, if this is selected, then all items with the same nominal code would be grouped together and posted as a single item.
  • Use Ave Cost for Zero Cost Items: Tick this option if you wish the profit for items with zero cost price to be calculated based on the historical average cost price.
  • Zero Item Profit: If you so wish, you can set the percentage profit for items to a set percentage of their sell price from 0 - 100% or any other percentage value; make sure to untick the above option.
  • Bundled Items: When orders are shipped, packaging notes can be created for orders that are to be exported. By default, the items are considered to be shipped on pallets. However, if some items are shipped as bundles then you can add a comma delimited list of stock item prefixes (starting part of the stock codes) that are sent as bundles. The actual setting can be overidden when the packaging notes are created.
  • Del Inv: Allow sales invoices / credit notes to be deleted ? The option hase 4 settings:
    1. No: The Delete. button on the Invoices List View is not displayed, hence the delete functionality is disabled.
    2. Un-Posted Only: Only invoices and credit notes that have NOT yet been posted may be deleted.
    3. Posted Only: Only invoices and credit notes that HAVE been posted may be deleted.
    4. All (Posted / Un-Posted): All invoices / credit notes may be deleted.
  • Aged Debtors Tax Code: In aged debtors to date (net values) report, if there are any payments that have not been allocated to sales invoices then the system cannot determine the tax element of the payment. Here you can define what rate of tax should be assumed for these unallocated payments. If you set this to zero then the aged debtors to date net value report will be off by the tax element of these payments.

Index | Sales Ledger | Purchase Ledger | Stock Control | Payments | Nominal Ledger | Reports | Configurations

  Top | General | Auto | Ageing | Currency & Tax | Intrastat | Sales | Purchase | Nominal | Stock | Stock Pick | Email | User | Workstation | Text Editor

EPOS : Electronic Point of Sale

Configurations: Workstation / Till

Ice Ledger can be configured for use as a point of sale terminal or to put it in another words, used to operate tills. For further details, go to: EPOS features.

For every till terminal that is to be setup, you must define at least two nominal codes - one for cash sales and another for credit card sales. These are used to record the daily sales for each till. You should not use the same nominal codes for two or more tills. If you do then sales figures for these tills will be pooled together.

When a till is 'cashed up', at the end of the day or a shift, the money and total value of all credit card sales are transferred to the master bank nominal codes for cash and credit cards. Any shortfalls are added to the Shortage nominal code.

EPOS configurations include:

  • Master Cash Nominal: Bank nominal code to be used for transferring all till cash sales to.
  • Master Credit Card Nominal: Bank nominal code to be used for transferring all till credit / debit card sales to.
  • Shortage Nominal: Nominal code to be used for recording all shortages when cashing up, at the end of a sales session for a till.
  • Till ID: This is the ID of the computer that is being used as the till.
  • Cash Nom: Bank nominal code dedicated to the specific till for cash sales.
  • Credit Nom: Bank nominal code dedicated to the specific till for credit / debit card sales.
  • Till Float: This is the cash amount that is put in to the till at the start of day.
  • Post Invoices: If this option is ticked then when the sales invoice (till receipt) is saved, the financial details are posted automatically to the ledger.
  • Post Stock: If this option is ticked then items sold at the till are automatically removed from the stock inventory.


Till Settings

  • Post Invoices: Each till transaction is saved as an invoice on the system. Checking this option, posts the transaction details to the ledgers automatically.
  • Post Stock: If this option is selected, then as items are checked out at the till, the stock levels are adjusted / reduced automatically.
  • Cost Price includes VAT: If this option is selected, then in the Book In Stock screen, cost price of items are entered as including VAT.
  • Sell Price includes VAT: If this option is selected then the sale price, entered in the Book In Stock screen is taken as including VAT.
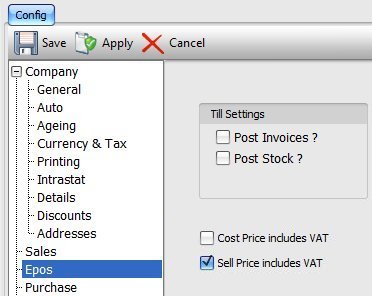
  • Configurations: Point of Sale


    Satelite Display

    This is typically for a second, customer facing screen. The system has another independent application (program), EPOSDisplay which allows a second screen to display transactions (checkouts) that are being carried out at the till. This application has it's own configuration file, eposdisplay.cfg that is in the same folder as the application file, eposdisplay.exe. Below is a short sample configuration file:

    ; Location of Second Screen in relation to the primary screen (Left, Right, Top or Bottom)
    ScreenLocation=Left
    
    ; file to watch for changes
    WatchFile=C:\Dev\EPOSDisplay\Output\fsw_test.txt
    
    ; display
    font_size=14.25
    
    ; Hide Till Strip after x seconds of inactivity
    ; 0 = never hide till strip
    HideInterval=10
    
    ; list of a videos to play (will loop)
    Video=C:\Videos\Games-of-2023-24.mp4
    ;Video=C:\Videos\shop1.mp4
    ;Video=C:\Videos\shop.mp4
    
    ; path and filename of logo image to display if no videos are specified
    LogoFile=C:\Dev\EPOSDisplay\Output\gog.jpg
    

    Any line that begins with a semi-colon (;) is a comment and is ignored by the system.

    • ScreenLocation: With Windows operating system configured for multiple displays, this option sets the screen that is to be used to display the till transactions.
    • WatchFile: When a till transaction is being carried out in Ice Ledger, the details are save to a text file, that is monitored and used by the EPOSDisplay application to show the till transaction on the selected screen. EPOSDsiplay.exe and Ice Ledger application must be in the same folder. When Ice Ledger application starts, it reads the EPOSDisplay configuration file to get the full pathname of WatchFile.
    • font_size: Determins the size of the text used to display the till transactions on the screen
    • HideInterval: Once a till transaction has been completed, wait for the number of seconds (specified here) of inactivity, before clearing the last transaction from the screen.
    • Video: You can specify 1 or more videos for display on the 2nd customer screen. The listed videos will play in-turn. Once all the videos have been played, the play will restart with the first video. During a till transaction, the video display area is re-sized to allow the transaction to be displayed. The video continues to play in new, smaller window. Once the till transaction details are no longer showing, the video display area goes back to normal.
    • LogoFile: You can also specify a company / brand logo file. If there are no videos to be displayed, the system will show the defined logo on the customer screen.

Index | Sales Ledger | Purchase Ledger | Stock Control | Payments | Nominal Ledger | Reports | Configurations

  Top | General | Auto | Ageing | Currency & Tax | Intrastat | Sales | Purchase | Nominal | Stock | Stock Pick | Email | User | Workstation | Text Editor

Purchase

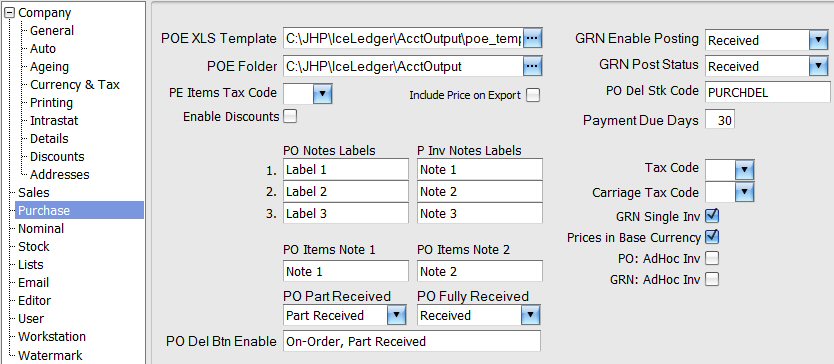
Configurations: Purchase Ledger


  • POE XLS Template: Full path name of the Microsoft Excel Spreadsheet that is to be used as the template for creating Purchase Order Enquiries (POE). The template MUST conform to the template requirements.

  • GRN Single Inv: If this option is ticked then a single purchase invoices is created for all the items, received on any given Goods Received Note (GRN), irrespective of whether the items are from multiple purchase orders. If you wish to create a separate purchase invoice per purchase order for items booked in any one GRN, then uncheck this option.

  • :

  • :

Index | Sales Ledger | Purchase Ledger | Stock Control | Payments | Nominal Ledger | Reports | Configurations

  Top | General | Auto | Ageing | Currency & Tax | Intrastat | Sales | Purchase | Nominal | Stock | Stock Pick | Email | User | Workstation | Text Editor

Nominal

Index | Sales Ledger | Purchase Ledger | Stock Control | Payments | Nominal Ledger | Reports | Configurations

  Top | General | Auto | Ageing | Currency & Tax | Intrastat | Sales | Purchase | Nominal | Stock | Stock Pick | Email | User | Workstation | Text Editor

Zero Trial Balance

Index | Sales Ledger | Purchase Ledger | Stock Control | Payments | Nominal Ledger | Reports | Configurations

  Top | General | Auto | Ageing | Currency & Tax | Intrastat | Sales | Purchase | Nominal | Stock | Stock Pick | Email | User | Workstation | Text Editor

Stock

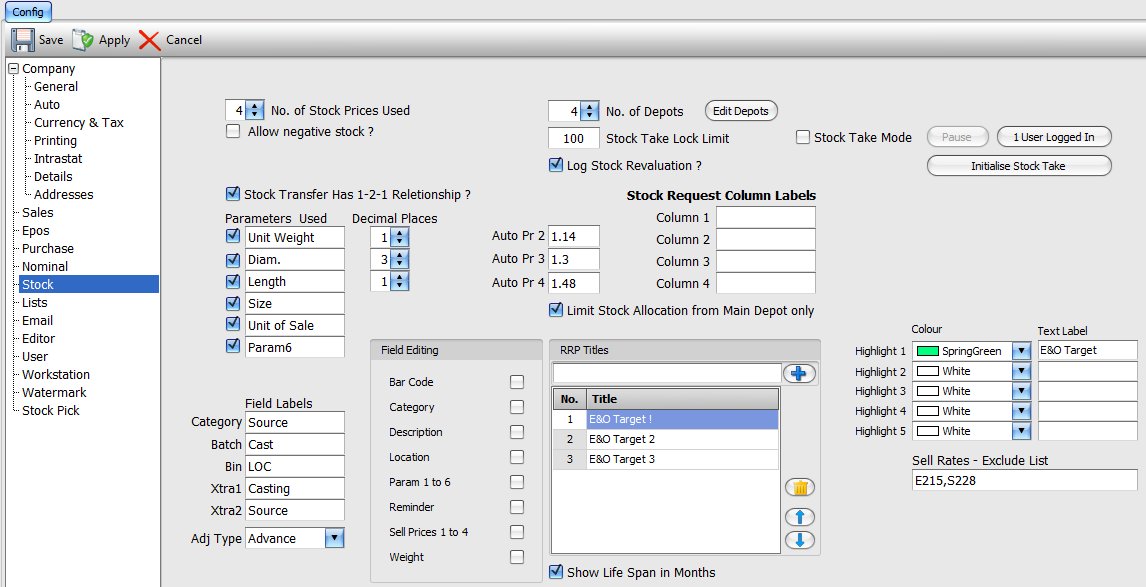
Configurations: Stock Control


  • No of Stock Prices Used: Stocked items can be assigned up to 4 separate sell prices.
  • Allow Negative Stock: You may allocate only available stock to sales orders. If you wish to be able to over allocate i.e. allocate stock that you do not have or have not entered into the system then check this option. So, when stock is posted, quantity in stock will become negative.
  • Enable stock manufactrer field in stock system?: - not used, for future development.
  • Enable stock sub-code field in stock system?: - not used, for future development.
  • Stock Transfer Has 1-2-1 Relationship: Stock may be transferred from one stock code to another. If a single quantity in the from stock code, A refers to a single quantity in the destination stock code, B the tick this option. However, if you sell items as single units and as multi-packs and wish to be able to convert (transfer) multi-pack stock to single units then leave this option un-checked.
  • Parameters Used: There are 6 custom fields (3 numeric and 3 character) that you can define. Check the box for the relevant field you wish to use and enter the appropriate label for the field in question. For numeric fields, you can also define the number of decimal places. In the picture above, the following custom fields are depicted:
    • Unit Weight
    • Diam.
    • Length
    • Size
    • Unit of Sale
    • PICKED BY
  • Show Sale History: - for future development.
  • Field Labels: The names of a number of fields (Category, Batch, Bin, Xtra1 & Xtra2) in the sales order items may be customised here.
  • Adj Type: You may choose the stock adjustment screens between the much simpler, Basic & the more detailed, Advance options.
  • Field Editing: By default, the stock items list view (Stock, Items) is a view only screen to help easily locate and identify stocked items. However, at time it is more convenient to update stock item details in a list view rather than in individual stock records - circumventing the need to edit individual records one at a time. To facilitate this, a number of key fields may be set as editable. Check the options to make the relevant fields as editable.
  • No of Depots: Define the desired number of depots. You must restart the program for the settings to take effect.
  • Edit Depots: Use this button to name the various depots.
  • Stock Take Lock Limit: In the stock take screen, you can 'lock' one or more stock records during the stock adjustments. Whilst a stock record is locked, other users are prevented from making any adjustments to their stock levels. Here, you can limit the maximum number of stock records that may be locked at any one time.
  • Log Stock Revaluation: In the stock list view , the Revalue button may be used to revalue the stock. If you wish to audit (record) such changes then enable this option.
  • Auto Pr 2 - 4: In the Stock Sell Prices screen, you can change / update sell price 1 and have sell prices 2, 3 and 4 updated automatically as a specified multiple of sell price 1 (you must check the option, Auto Update Prices 2 - 4 in the Sell Prices screen). To do this, enter the appropriate multiplier values here.
  • Stock Request Column Labels: In Stock, Stock Record, Stock Tab screen, there are 4 custom columns, the titles of which may be defined here.
  • Limit Stock Allocation from Main Depot only: If the number of depots, above are set to greater than 1 then you can assign stock to sales orders from any depot. Enable this option to restrict stock allocation from the main depot, 1 only.
  • RRP Titles: You can assign reccomended retail prices to stock items from multiple suppliers. Here, you can assign short titles to the different RRP suppliers. Enter the supplier title at the top and click the button with the plus sign to add it to the list. To remove an entry, click on the entry to select it and use the button with the gold bin icon. You can change the list order by using selecting an entry and using the up / down buttons. Special Note: You can use this feature to add any additional custom column you wish, the columns do not have to refer to RRPs.
  • Colour: In stock list view screen, you can highlight (change the background colour) stock records Here, you can define up to 5 different highlight colours and associated short descriptive labels. For more details, see Stock, Items list view. To disable / remove a particular option, set the colour to White.
  • Stock Take Mode: Before undertaking stock take, you can set the system into Stock Take Mode to prevent anyone adjusting stock levels for examply by shipping sales orders or booking stock in Goods Received Note (GRN) etc.. You must click the Save / Apply button for the changes to take effect.
  • Pause: If the system is in Stock Take Mode, you can pause the Stock Take process by clicking on this button and Apply changes.

Lists

Configurations: Lists


Email

Configurations: Email


TExt Editor

Configurations: Editor


Index | Sales Ledger | Purchase Ledger | Stock Control | Payments | Nominal Ledger | Reports | Configurations

  Top | General | Auto | Ageing | Currency & Tax | Intrastat | Sales | Purchase | Nominal | Stock | Stock Pick | Email | User | Workstation | Text Editor

User

Configurations: User Settings


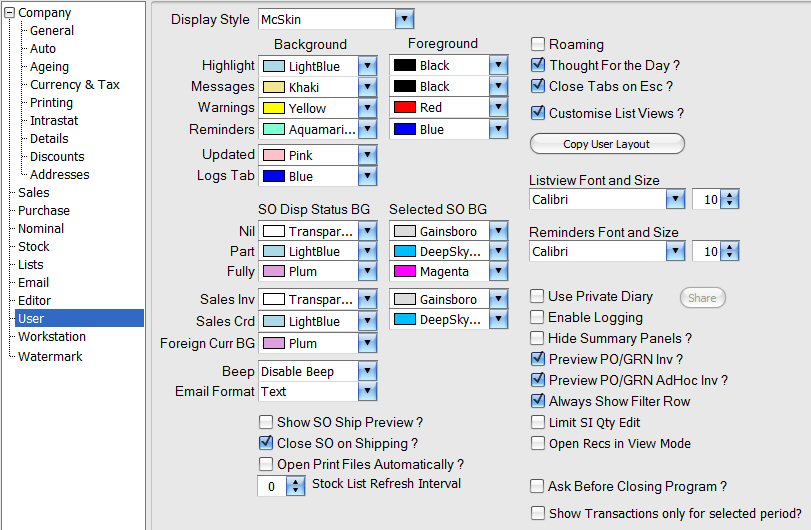
  • Show SO Ship Preview?: If this option is set then when a Sales Order is shipped, then the shipping manifest is displayed on screen and may be amended before the shipment is processed.
  • Close SO on Shipping?: If this option is checked then when a SO is shipped, the SO is closed to leave a blank SO screen.
  • Open Print Files Automatically?: If this option is checked then when you print a document to a file then the file will be opened automatically.
  • Stock List Refresh Interval: Is this is set to 1 or higher then the Stock Items list view will be refreshed automatically, every selected number of minutes, to display the most up to date information. This is useful in a multi-user setup where the stock levels may change due to activity of other users on the network.
  • Stock List Refresh Interval: You can define the folder location where shared files are to be saved. If you want individual users to be able to access their customisation settings from other workstations on the network, then you should define a folder on the network that can be accessed by all the workstations concerned.
  • Rep List: You can enter a comma delimited list of reports if you want to restirct user access to limited reports.
  • Close Tabs on Esc?: If selected, the the user can close open tabs in the main screen by pressing the Esc key.
  • Customise List Views?:
  • :
  • :
  • :
  • :
  • Ask Before Closing Program?: If this option is checked, you will be asked to confirm your intention when you close the program.
  • Show Transactions only for selected period?: If this option is set then in Sales Orders list view, only orders up to the current program date are listed i.e. any orders with a future date are not listed. To list orders with future dates, this option must be unchecked.
  • User Server Mode: This option determins how the program fetched data from the server. In non server mode, the system fetched ALL the data, as per all the filter settings. This means when there is a large amount of data / number of transactions, it can take some time for the server to retrieve the data and also place a higher load on the network traffic. In the Server Mode, the system only retrieves a small subset of data for displaying on the screen. This is updated automatically as you scroll down the screen, with the system getting the required data. As a result, the server does not have to do as much work, there is a much lower load on the network traffic and the system is much faster and responsive. This feature is implemented only in the Sales Order list view.
  • :

Index | Sales Ledger | Purchase Ledger | Stock Control | Payments | Nominal Ledger | Reports | Configurations

  Top | General | Auto | Ageing | Currency & Tax | Intrastat | Sales | Purchase | Nominal | Stock | Stock Pick | Email | User | Workstation | Text Editor

Workstation

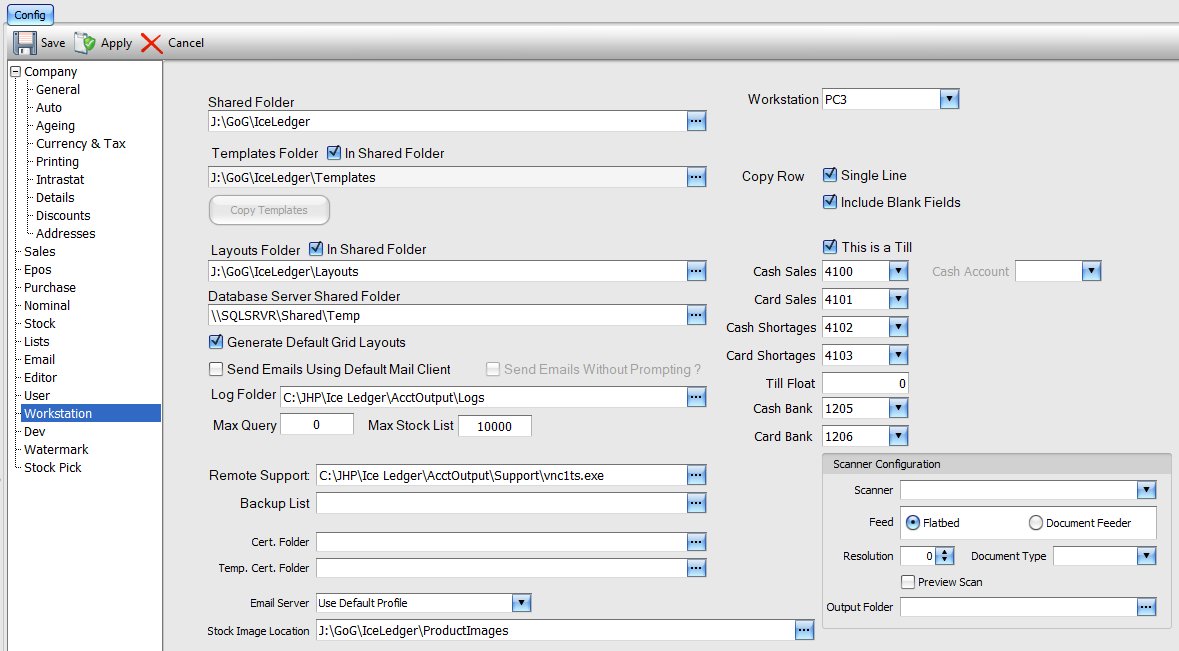
Configurations: Wrkstation Settings


  • Shared Folder: You can define the folder location where shared files are to be saved. If you want individual users to be able to access their customisation settings from other workstations on the network, then you should define a folder on the network that can be accessed by all the workstations concerned.
  • Templates Folder: Select the folder where all the stationary templates are located.
    • in Shared Folder: Tick this option if the Templates folder is to be within the Shared folder.
  • Copy Templates:
  • Layouts Folder: Folder in which the users layout settings files should be saved.
    • in Shared Folder: Tick this option if the Layouts folder is to be within the Shared folder.
  • Database Server Shared Folder: This is the folder / network path that is mapped / shared (on the local PC) on to a folder on the server.
  • Generate Default Grid Layouts: If this option is ticked, then the user is able to customise their own grid layouts.
  • Send Emails Using Default Mail Client: Check this option if you want emails to be sent using your designated email client.
  • Send Emails Without Prompting: Check this options to allow emails to be sent without being prompted.
  • Log Folder: Folder where diagnostic logs should be saved.
  • Max Query: If you have a large data set and want to limit the result to a set number of records, you can define the maximum number of records that should be returned by a query. A value of zero means no limit i.e. return ALL matching records.
  • Max Stock List: Maximum number of records that should be listed in the Items List in the Stock menu.
  • Remote Support: Full path name of an application that allows remote desktop support. It allows you to be able to connect your computer to a support help desk technician.
  • Backup List: You can define a text file contailing a list of additional files (one per line) that should be included in the backup archive file, whenever the data is backed up (Utilities, Backup Data). Each entry must be comma delimited and 1 to 3 entries:
    1. Full pathname of folder
    2. File name [optional]. Can use wild cards (* and ?)
    3. Files to be excluded [optional]. Can use wild cards
  • Workstation: The settings screen refferes to the current workstation. However, the system allows you to change the settings of a different workstation by selecting its computer ID from the drop-down list.
  • Copy Row: This option reffers to copying data from list views to the computer clip board. By selecting one or more rows in a list view and right-clicking the selected rows, you get display the copy menu. The options allow the data to be copied to the computer's clip board for pasting into either a text editor or an Excel spreadsheet. Single Line copies the data from all the columns in a row into single line. By default, the process excludes blank columns when copying data to a single line. To override this, check the Include Blank Fields option.
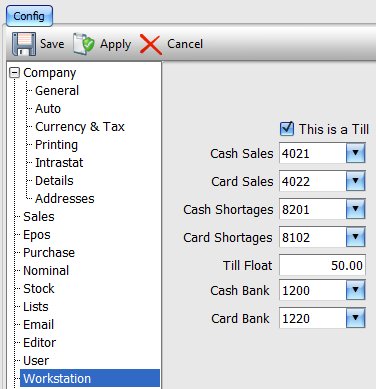
  • This is a Till: Ice Ledger has the ability to configure a workstation to act as an Electric Point Of Sale (EPOS) i.e. a till at a checkout. With suitable hardware (computer workstation, screen, till cash drawer, receipt printer and a barcode scanner) the system can operate as a normal till at a checkout. To setup a particular workstation as a till, simply tick this option; the following settings will be enabled:
    • Cash Sales: Nominal code to be used for recording all cas sales at the till. If the system is to be configured for multiple tills then you should use a different nominal code for each till.
    • Card Sales: As Cash Sales, above but for credit / debit card sales.
    • Cash Shortages: When the till is 'cashed up' at the end of a shift / day, the cash in the till may not tally with the total sales recorded for the shift / day. Enter the nominal code that should be used to record any such discrepencies. In the case of multiple till, you may use the same nominal code for each till.
    • Card Shortages: As Cash Shortages, above but for credit / debit card sales.
    • Till Float: This is the cash amount that is placed in the till at the begining of any shift / day.
    • Cash Bank: Bank Nominal code that is to be used to tranfer all the cash from the tills. This nominal code can also be the same for all tills.
    • Card Bank: As Cash Bank, above but for credit / debit card receipts.

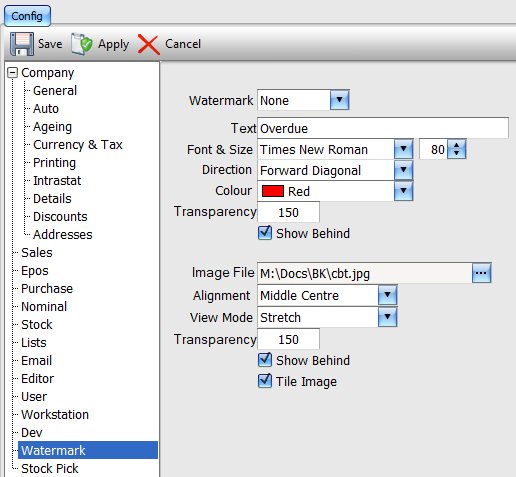
Watermark

Configurations: Watermark


Index | Sales Ledger | Purchase Ledger | Stock Control | Payments | Nominal Ledger | Reports | Configurations

  Top | General | Auto | Ageing | Currency & Tax | Intrastat | Sales | Purchase | Nominal | Stock | Stock Pick | Email | User | Workstation | Text Editor

Stock Picking System

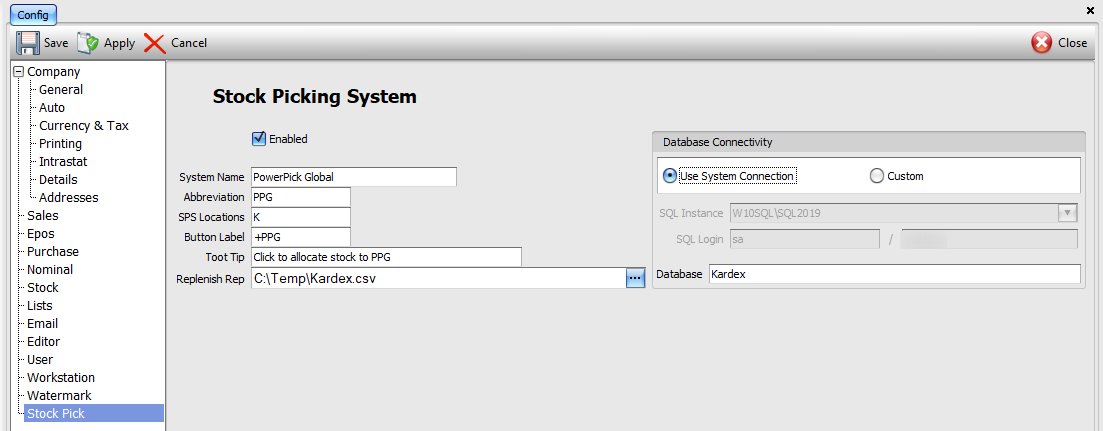
Configurations: Stock Picking System


Ice Ledger has the capability to integrate with the Kardex PPG stock picking system. To enable this feature, simply tick the box, Enabled and define the details, listed below. Remember for a user to gain access to the Stock Picking Menu you must enable access in their user access priviledges

  • System Name: Short name for the stock picking system (SPS).
  • Abbreviation: Abbreviation for the SPS.
  • SPS Locations: Prefix for ALL storage locations (bins) that are part of the SPS. It does not matter if you reffer to ALL storage locations by a single name. However, if the storage locations are referenced individually then they must all have the same prefix, defined here.
  • Button Label: Text label for the SPS button.
  • Tool Tip: A short description for the SPS button.
  • Replenish Rep: Full pathname of the stock replenish report from the SPS.
  • Database Connectivity:
    • Use System Connection: Select this option if the SPS implementation uses the same database server and connection details. If the SPS database requires different credentials, then select Custom.
    • SQL Instance: Enter details of the SPS SQL server as ServerID\SQLInstance
    • SQL Login: Login ID and password for the SQL user to connect to the SPS database.
    • Database: SPS SQL database name.


Index | Sales Ledger | Purchase Ledger | Stock Control | Payments | Nominal Ledger | Reports | Configurations

  Top | General | Auto | Ageing | Currency & Tax | Intrastat | Sales | Purchase | Nominal | Stock | Stock Pick | Email | User | Workstation | Text Editor

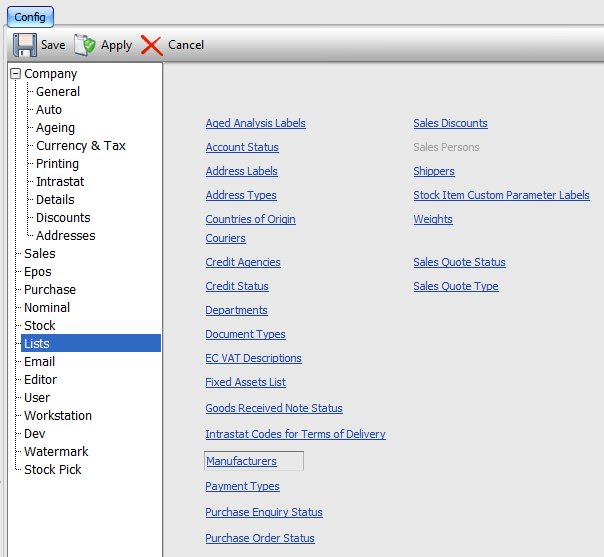
Lists

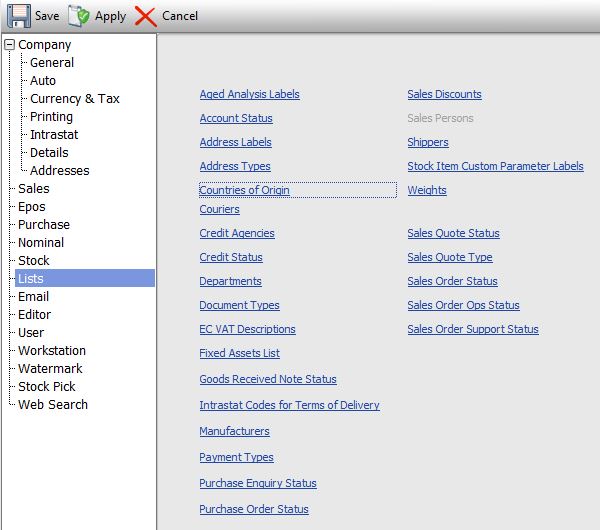
Configurations: Lists


The system deploys a number of lists that can be updated via this Lists option. Items in each list may be amended and the order in which they are displayed / listed on the screen can also be changed by moving the selected item using the 4 buttons Configurations: Lists in the bottom left of each list. To create a new entry in the list, simply add the new entries to the bottom of the list till done and click the Save button to save changes. To remove a particular entry, click to highlight and then click the Delete button. Defined lists include:

Account Status Various Account Status entries can be created and amended.
Address Labels The various address and contact related field names can be defined in this list.
Address Types Labels for the different address type can be changed here.
Couriers Names of various couriers / delivery companies can be defined.
Credit Status Various Credit Status entries can be created and amended.
Countries of Origin For goods that are to be exported, the origin of items are defind in relation to the stock Tag Prefix, defined in Supplier Settings and the Tag in Purchase Order header.


Email

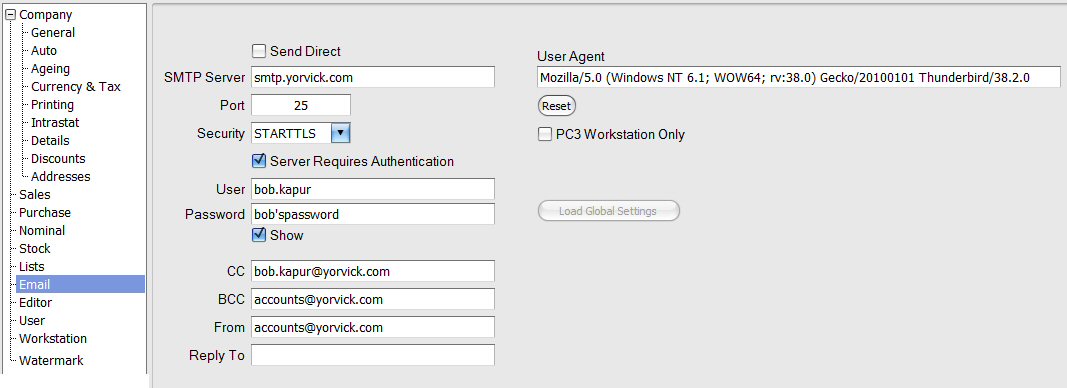
Configurations: SMTP Mail Server Details


The send emails through the system, you need to enter your SMTP mail server details. If you are not sure what they are you can check in your email client program or contact your Internet Service Provider:

  • Send Direct: If this option is ticked, the system will attempt to send email messages directly to the recipient mail server. There is an additional overhead in looking up the recipient

Index | Sales Ledger | Purchase Ledger | Stock Control | Payments | Nominal Ledger | Reports | Configurations

  Top | General | Auto | Ageing | Currency & Tax | Intrastat | Sales | Purchase | Nominal | Stock | Stock Pick | Email | User | Workstation | Text Editor

Text Editor

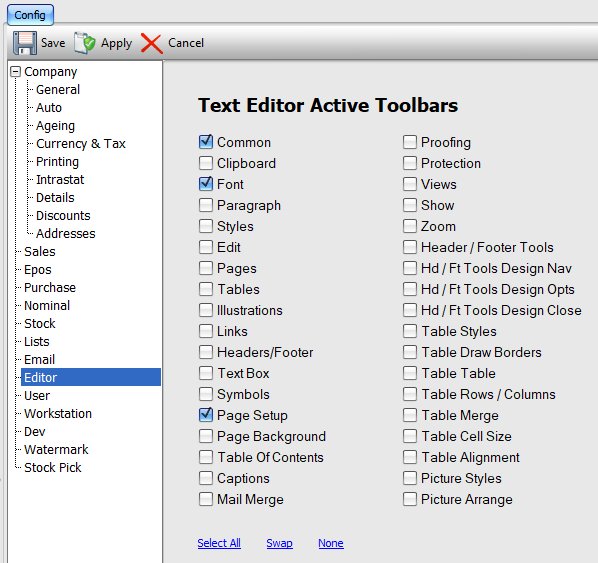
Configurations: Text Editor


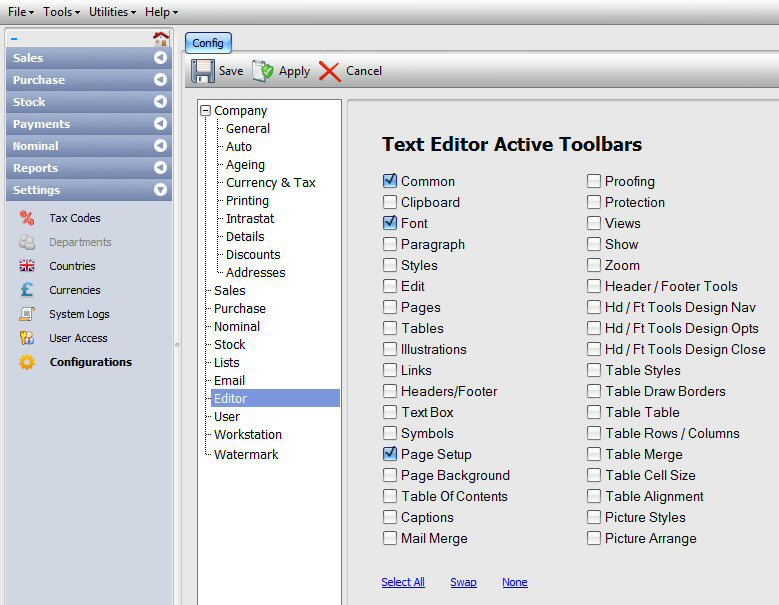
The text editor my be configured to display additional tool bars to provide greater functionality. Tick the required option to activate the appropriate tool bar. Any change is settings take immediate effect on all currently open and new editor windows and remain in effect till the program is restarted. To make the changes last between sessions, click save to save the new settings.

Follow Us on Facebook  Follow Us on Twitter  Follow Us on YouTube
Copyright © 2014 - 2025 1T Solutions Limited. All Rights Reserved.
/index.php?dir=h&pg=configurations