Sales Orders
- Home
- Sales Orders
Sales Orders
Index | Sales Ledger | Sales Orders | Shipments | Sales Invoices
Orders / Quotes
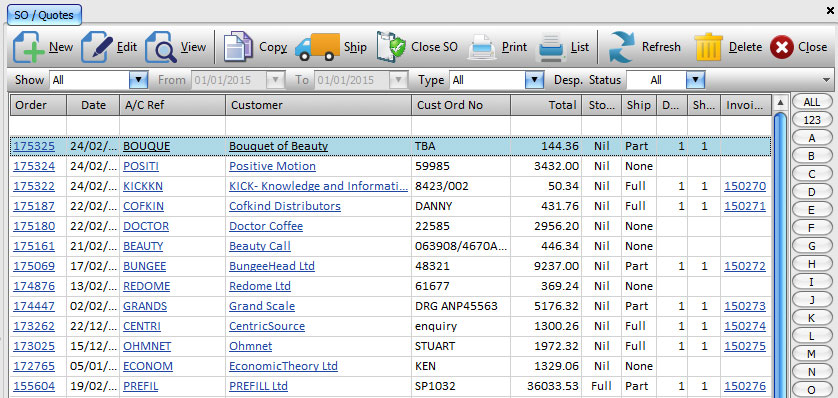
This option displays a list of all your existing quotes and orders whilst providing everything you need to create and manage your quotes or orders. By utilising the extensive features of the list, you can search, sort, filter and group the list in any way you wish, for more information on how to do this, see the Lists help page.
There are several buttons on the toolbar above the list, a brief overview of their functionality is detailed below:
- New. As the name suggests, this allows you to add a new quote or order to the system.
- Edit. Allows you to edit the quote or order currently selected in the list. An alternative to using this button is to double-click on the desired entry for the quote or order you want to edit. Selecting to edit a quote or order will lock the record so that others users of the system can’t edit the same record as you. The lock will be released once the record has been closed by saving or you closing the form. If you just want to view the quote or order, then you can use the View option, detailed below, to view all quote or order details without triggering any locks.
- View. Opens the selected quote or order in View mode. This option doesn’t lock the record, therefore allowing others full access. Note that functions that would ordinarily save changes that are made to the record are disabled till you choose the option to Edit the record from within the View screen.
- Copy. Copies the selected quote or order to a new quote or order. If you have a customer that wants to repeat an earlier order, you can copy that order and change the required details without having to start from scratch saving you time.
- Ship. Allows you to ship (dispatch) selected orders that have stock allocated. Depending on configuration, this option will ship the order and generate a Sales Invoice based on that shipment. You can ship more than one order at a time using this option by selecting multiple orders from the list.
- Close SO. Mark the selected quote or order as Closed indicating that it is complete. An order can’t be closed if there is any stock allocated to the order.
- Print / List. Print selected quotes or orders using a user definable template including Delivery Notes, Picking Lists etc. To learn more about creating templates etc, see our Report Designer section.
- Refresh. As others using the system can make changes to the Quotes/Orders etc, this will refresh the list to get the latest changes.
- Delete. Delete the selected quotes or orders. A order can’t be deleted if there is an allocated or delivered quantity on one or more items.
- Close. Closes the Quote/Order List screen.
You will notice that in the list, some column contains Hyperlinks, pressing and holding the <CTRL> key whilst left clicking on the appropiate will open the corresponding item in View mode. For example, in the image above, the first listed order is for ‘BOUQUE’, activiting the Hyperlink for the A/C Ref, will open the Customer Record for ‘BOUQUE’ in view mode.
Index | Sales Ledger | Sales Orders | Shipments | Sales Invoices
Order/Quote Record
This screen allows you to enter all relevant details about your quote or order, the screen is split into multiple tabs categorising the details into smaller easier to follow sections, there are other tabs for the billing and delivery addresses, deelivery charges, for nominal account and notes, currency details and profit overview.
There are several buttons on the toolbar at the top, a brief overview of their functionality is detailed below:
- Save. Save any changes made to the current quote or order. This button is disabled if the quote or order was opened in view mode.
- Cancel. Cancels any changes made to the current quote or order. This clears the form where you can either enter a new quote/order or load an exisitng quote/order by entering the appropriate quote/order number. Leaving the A/C Ref field blank and clicking Cancel for a second time will close the form.
- Ship. If the stock is part of fully allocated, then this button will ship the currently allocated stock.
- Close SO. Mark the current order as Closed.
- Print. Allows you to print the quote/order, print a delivery note or picking list using a user definable template.
- Profits. –
- Close (not pictured). Close the quote/order screen. A prompt will appear asking if you want to save before closing.
Click on the appropriate tab to define or view the details.
Order
For a new quote or order, leave the Order No. set to ‘NEW’ and proceed to entering the desired customer reference. Entering an existing Order No will fetch the details of the matching quote/order.
- Type. Are you creating a Order or a Quote? Press ‘O’ for Order or ‘Q’ for Quote or select from the list by click on the arrow.
- Quote Status. If creating/editing a Quote, here you can the status to whether it’s Live, Expired or Dead.
- Expiry Date. The date when the quote validility expires if the quote is only valid for a specific amount of time.
- Sales Person. Enter the Name or initials of the person who is entering the order and/or quote.
- Order Date. Date the order or quote was placed / entered on to the system.
- Delivery Date. The expected date the delivery of the order will take place.
- Cust Ref.. A space to enter any reference provided by the customer in relation to this order.
- Discount %. Percentage Discount to be applied to the order.
- Shipments. How many shipments has this order been delivered over.
- Nil, Part & Full. Indicators to show stock allocation status. Clicking on ‘Nil’ will de-allocate all stock on the Order, whilst clicking on ‘Full’ will allocate all remain stock on the order.
- Net, Carriage, Tax etc. Shows the Order Totals in a logical format. If the currency of the customer is a foreign currency, a second column of figures will show, showing the totals in the customer currency.
Addresses
- Company. The name of the Company the order/quote is for.
- Select Address. You can select an address from the Customer’s Address book for the both the Billing (left hand address) and the Delivery Address (right hand address).
- Delivery To. If the order is been delivered to another company other than who the order is for, you can enter the Company Name here.
- Address. Enter the Billing (left side) and/or the Delivery (right side) addresses.
- Tel. The contact number for the billing contact for the Order/Quote.
- Courier. Here you can select which Courier the order will be shipped by. This list is customisable via the Lists options in Configuration.
- Consignment Ref. You can record the consignment note of the shipemt(s) in this field.
- Boxes. The number of boxes for the shipment.
- Carriage.
- Nominal Code. The Nominal Code for Delivery Charge.
- Department. If you use Departments, the department code for Deliveiries
- Tax Code / Rate. Enter the Tax Code that is applicable to the entered delivery charge. The field to the right will show the current rate for the selected Tax Code. The Tax Rate can be manually changed here whilst only affecting this specific order.
- NoTC. Nature of Transaction Code.
- Terms of Del. Terms of Delivery.
- Net. The net amount to be charged for delivery.
- Tax. The tax amount.
- Gross. Total Delivery Charge (Net + Tax).
- Default. If one is defined, set the delivery to the customer’s default delivery address.
- Order Weight. The total weight of the order.
Nominal & Notes
- Nominal Code. Set the Global Nominal Code for the order. Clicking on the button to the right of the field will set the Nominal Code for all the items on the order to the currently selected Nominal Code.
- Department. If you use departments, which department to use.
- Tax Code / Rate. Set the Global Tax Code for the order. The field to the right will show the current rate for the selected Tax Code. This can be changed here if required. Clicking on the button to the right of the Tax Rate field will set the Tax Code for all the items on the order to the currently selected Tax Code.
- Bank Account. Enter Account Reference any monies will be paid into/against.
- Payment Type. The payment type to be used when paying for the order.
- Payment Ref. Payment Reference.
- Paid Amount. Pre-paid amount.
- Notes 1 – 3. You can enter three lots of notes relating to the quote/order, the customer or anything related. The labels for each of the notes fields can be changed under Sales in Configuration.
Currency
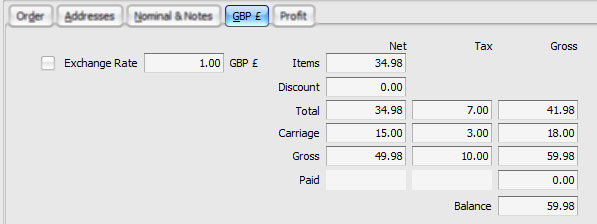
This tab shows a breakdown of the order totals including Net, Tax, Carriage, Discount, pre-payment and Gross values. By default, these would be shown in the Base Currency. If your running a multi-currency system and the current customer is a foreign currency customer, checking the checkbox will show the values in the customer currency.
Checking the checkbox also enables you to be able to change the exchange rate used in the calculations. If the newly inputted exchange rate is different to the system exchange rate, you are asked if you want to update the system with the new rate.
Profit
This tab give you a breakdown of the profit the order will generate on a per item basis.
Items
There are several buttons on the toolbar above the item grid, a brief overview of their functionality is detailed below:
- Details. View the selected item in more detailed view.
- Insert. If you want to keep the list of items in a specific order and you need to add a item to be, for example third in the list, select the thrid row and click insert, the system would create a new item at row 3 pushing the preceedig items down by 1.
- Net Price. Re-calculate the Price by dividing the current price by the order quantity.
- Refresh Stock. Refresh the stock figure for each item in the list.
- Delete. Delete the selected item(s). Items with stock allocated, that have a quantity that’s been delivered can’t be deleted.
For each item in the list, there is Stock Allocation button which allows you to allocate stock to the order for the selected item. For a more detailed look at Allocating Stock, see Stock Allocation.
Details
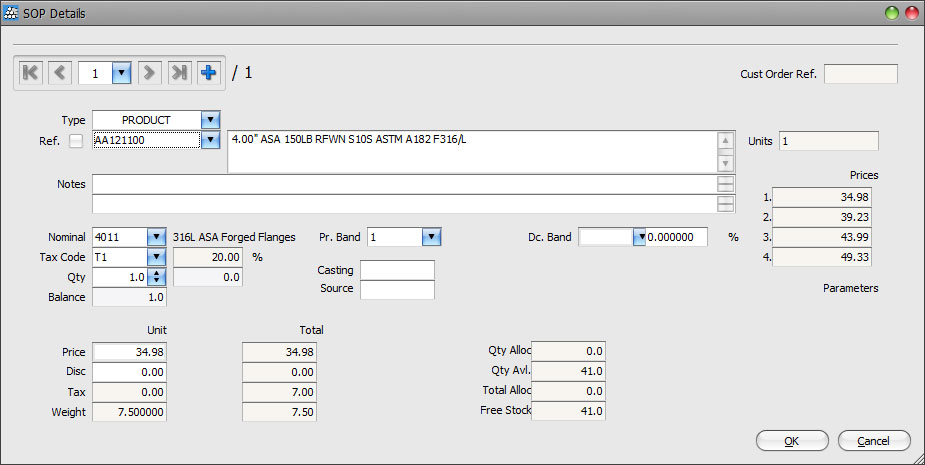
Clicking the Details button above the item’s grid, open the currently selected item in a more detailed screen, you can use this to modify the item if you dislike the idea of entering information ina grid or if you want to edit details that are not shown on the grid.
By using the navigation buttons in the top left corner, you navigate through the exisiting items on the order or create a new entry from here.
Index | Sales Ledger | Sales Orders | Shipments | Sales Invoices


