 |
 Watch Backup Video on Youtube |
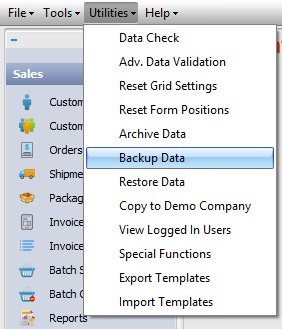
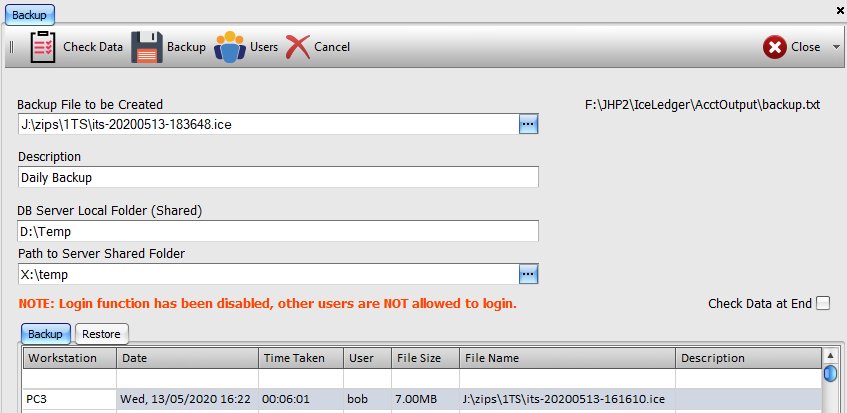
To backup your company data, select Backup Data from the Utilities menu to open the Backup screen. On a multi user / network setup, a message in red is displayed: NOTE: Login function has been disabled, other users are NOT allowed to login.

The system automatically generates a backup file name based on your backup file naming template in settings (Settings / Configurations / Company / Auto). Use the button with 3 dots, to the right to select the drive and folder where you would like the backup file to be saved.
Description. You can add a short description for your backup.
DB Server Local Folder (Shared). This is the folder on your server that is shared on your local network. If you are using a stand alone system, then this can be any folder with write permissions. This can be set in system settings (Settings / Configurations / Workstation - Database Server Shared Folder).
Path to Server Shared Folder. This is the folder path on your network that referrs to the shared folder on your server i.e. networ path to the above folder on the server. On a stand alone system, this MUST be the same as the folder listed above. Both of these folders can be defined in system settings. This can be defined in system settings (Settings / Configurations / Company / General - Server Shared Folder).
Once the above 2 folders have been set correctly, you can click the Backup button to start the backup process. Once the initial part of the backup process (making a copy of the company data) has completed, other users are allowed to login and the abobe message, in red, disappears. During the second stage of the backup, the data and other associated files are archived (compressed) in to a single backup file.
If you have defined a separate text file containg a list of additional files that should be included in the backup (see below), then the name of the file will be shown on the screen.
Details of the backup progress is listed in the lower part of the screen, including summary details of previous backups.
You can get the system to include additional files to be backed up by creating a text file, containing a list of files to be included in the backup, and defining its location in Settings, Configurations, Workstation. A sample text file is listed below.
; Ice Ledger Sample Back Up Files List
; Blank lines and lines beginning with a semi-colon (;) are ignored
; List of additional files to be added to the backup archive
; Single entry per line
;
; Add all files and sub-folders in a given folder (must end with a back slash)
; C:\Temp\1\
;
; Add specific files (can use wild cards) in a folder; all file beginning with the letter, C
; C:\Temp\3\C*.*
;
; Add all files and sub-folders in a given folder, except those that begin with the letter, U
;   Specify folder name, terminated with a back slash, a comma, a minus sign followed by
;   File pattern to exclude. Exclude all file that begin with the letter, U
; C:\Temp\4\,-U*.*

J:\GoG\IceLedger\ProductImages\
Blank lines and line beginning with a semi-colon are ignored. Each file list entry must be on a separate line and you can use the standard file related wild cards (? = any character and * = any one or more characters). Each line is a comma-separated line with the following structure:
You can run Ice Ledger using a batch file and pass additional parameters so that the system logs in and starts the backup process unattended. The batch file can then be scheduled to run when the system is not in use to perform an unattended backup. To setup an unattended backup, follow the guidelines, listed below:
Once the data backup has been completed, the system sends a confirmation email to the email address specified in the system Configurations, Company, General, Email Data Check. The system attempts to send the email directly to the recipient mail server. However, if this fails the the system sends the email using the mail server details in the system settings (Configurations, Email).
If the option to check the data is set then a separate email will be sent to the same email address.
WARNING: If you select to restore data, your current company data will be DELETED and replaced with the data from the backup. This process is NOT REVERSABLE. Consider making a backup of your data before continuing with data restore.
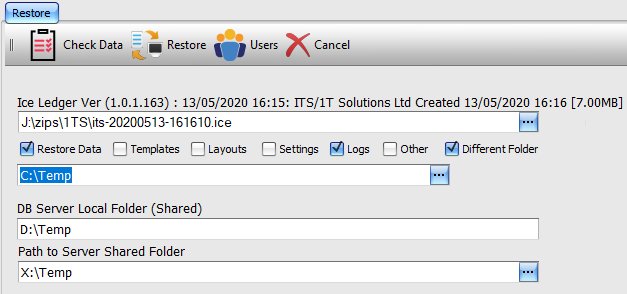
Select the option, Restore Data from the Utilities menu. Using the button with 3 dots, select the backup file (*.bak, *.ice, *.sas) containing the data you wish to restore. The system will then display detail from the backup file, above the selected file name.
Once you have selected the correct backup file, you can tick one of the options, below the file name, to enable the Restore button on the toolbar, above.
To resore the company data from the backup, you must tick the Restore Data option. You do NOT have to restore the company data to restore other files in the backup archive. If you tick any other options, then the option to restore these additional files to a Different Folder is displayed. Checking this option will further display an another field to select the folder where these files should be restored to.
If Restore Data is not checked but Different Folder is ticked then the company backup data will be extracted to the specified folder but NOT restored.
Once you have check the required options, click the Restore button, on the toolbar, to start the data restore process.
