epos
- Home
- epos
EPOS: Electronic Point of Sale
Setting Up a Till
A till is effectively a workstation with a suitable monitor, a cash drawer and a printer with a support for the cash drawer.
Each till is identified by its computer ID; if you are not sure how to change / set this, you can either search the web or go to YouTube. You MUST make sure that there is NO HYPHEN (-) in the computer ID.
It is best to have dedicated logins for till operators and to restrict their access to limited menu options of your choice. As the till operator login ID is printed on till receipts, you may not wish to use actual operator names as their login ID.
For each designated POS workstation (till), setup separate nominal codes – one for cash sales and another for credit card sales for each till.
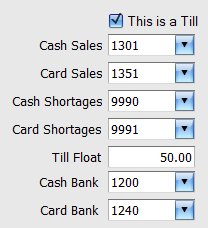
In Settings, Configurations, Workstation configure the settings, check the option, This is a Till on each till workstation and define the following details:
- Csh Sales: Select the nominal code that is to be used to tally all cash sales for this particular till.
- Card Sales: As above but for credit and debit card sales.
- Cash Shortages: If there are cash shortages, when cashing up a till at the end of the day, which nominal code should be used to record the shortages.
- Card Shortages: As above but for credit and debit card sales.
- Till Float: Till float – cash amount in the till at the start of the day.
- Cash Bank: Which bank nominal code should be used to transfer all till cash sales, at the end of the day ?
- Card Bank: As above but for credit and debit card sales.
When a till operator logs into the till workstation, he can use the Till option in the main Sales menu to process sales at the checkout. As items are checked out, the stock levels in the warehouse are reduced to give an up to date, true, stock levels. Cash and credit card receipts for items that are sold, are added to the associated nominal code accounts Nominal, Accounts. These may be monitored by the admin staff to view till takings in real time .
Till / Point of Sale
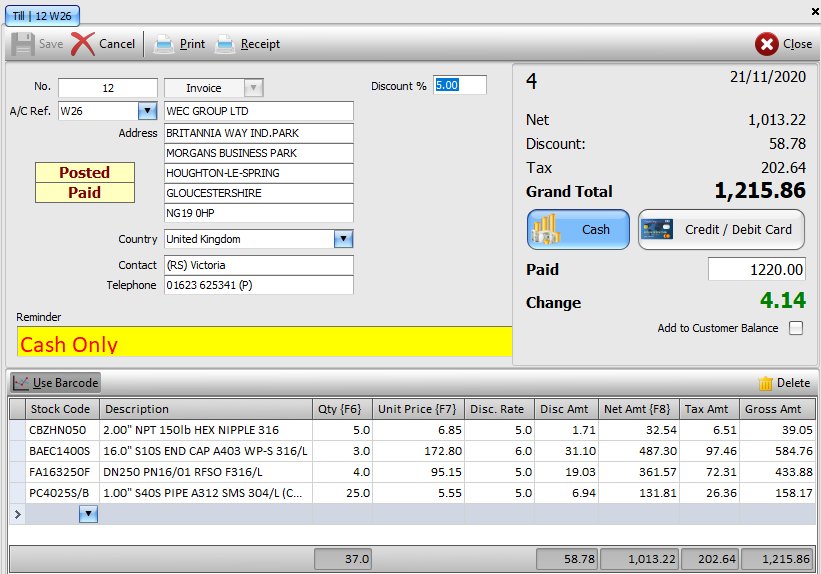
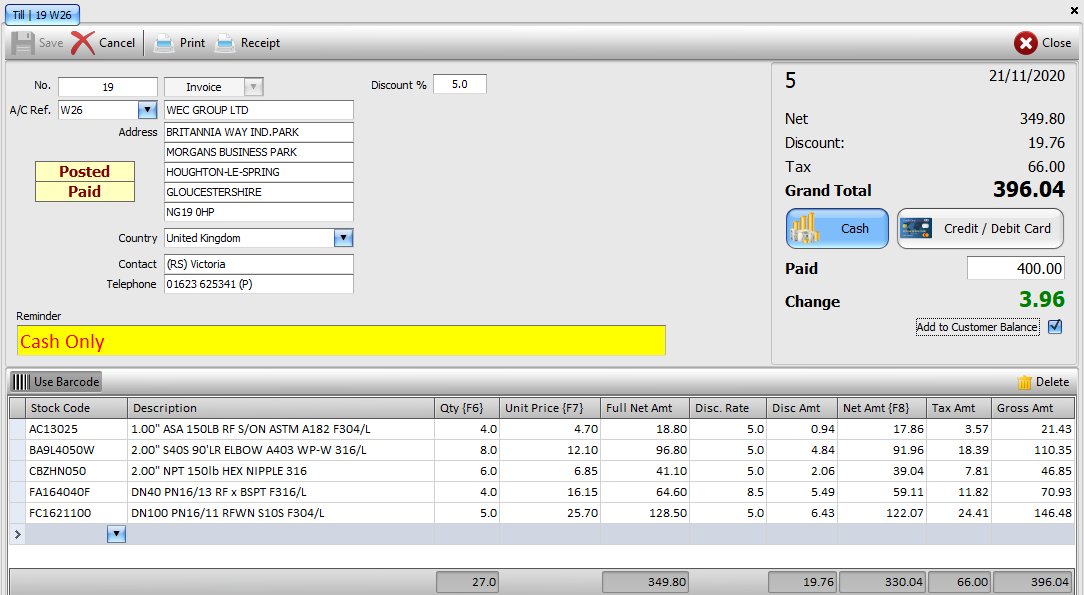
The picture, below shows the layout of the point of sales screen. The screen is divided in to a header section, at the top and items section, below. The various buttons, on the screen, have a keyboard shortcut which means the buttons may be clicked either using a mouse or their associated Alt-Key combination. The Alt key shortcut character is depicted by an underscore, in the above picture. If the underscore characters are not showing on your screen, simply press the Alt key on the keyboard. The various fields and buttons on the screen are:
Header Section
- Save: The Save button (Alt-S) saves all the sale details without printing anything. An invoice / till receipt number will be generated automatically. If you know the invoice / till receipt number, you can enter it in the Invoice No field, below to recall the sale information, at any time. Previous sales will have 2 additional labels displayed: Posted – stock and financial information has been updated and Paid – the goods have been paid for.
- Cancel: You can use this buttom (Alt-A) to abandon the current sale and clear the screen, ready for the next sale. Pressing this button when the screen is already clear will close the till screen.
- Print: The print button (Alt-P) display the print dialog screen which allows you to select the template that should be used for printing the till receipt and which printer should be used. Click print dialog for more details.
- Receipt: This button (Alt-R) will print the till receipt using the previously selected printer and document template in the print dialog, above.
- Close: The close button (Alt-L) will close the till receipt screen.
- Type: Document type – it is set to an invoice (i.e. till receipt) and cannot be changed by the operator.
- Invoice No: This is the unique invoice / till receipt number that is generated by the system automatically.
- A/C Ref: Unique customer account reference. For cash sales or sales to unregistered customers, create a separate customer account reference e.g. CASH which may then be used for every non-registered customer. Any details entered in the address section will be saved with the till receipt details.
- Address: When a registered customer account reference is entered, the system automatically displays the customer address and contact details.
- Reminder: If you have entered a reminder in the customer account record, then this will be displayed prominently on the till screen when the customer details are displayed. You can change the font, text size and colour in Settings, Configurations, User, Reminders.
- Top Right: The top right section of the header shows the current sale summary details. This section also includes a number of additional items:
- Cash: The cash button (Alt-C) is the default setting and signifies that the customer is paying cash for the items being sold. The cash amount for the sale will be added to the till’s total cash takings for the day to enable the end of day till cashing up procedure.
- Credit / Debit Card: Click this button (Alt-D) if the customer is paying by a credit / debit card. As with the cash button, the system keeps a separate total, of all sales, for all card payments. Selecting this option, automatically enters the exact sale amount as tendered, by the customer, in to the paid field, below.
- Paid: When the cash or debit / credit card buttons are ‘clicked’ the focus moves on to this Paid field automatically. Here the till operator can enter the amount received from the customer. If there is any change due to the customer, this is calculated by the system and displayed underneath.
- Change: This is generally greyed out. However, if the customer has paid more than the total amount for the items being sold then this becomes highlighted and shows the amount of change that is due back to the customer.
- Add to Customer Balance: Generally, this (Alt-B) is also greyed out. However, if the customare has paid more than the total sale amount and is due some change, then this additional amount can be added to their account to reduce any balance that they may already owe.
Items Section
The lower half of the screen is used to enter details of individual items that are being sold. The columns that are displayed and their order may be changed / customised to suite.
- Use Stock Code: Details of items being sold may be retrieved by scanning the item barcode with a barcode scanner. However, the system also allows item details to found using the item’s stock (SKU) code. Clicking this button (Alt-U) allows the operator to switch between barcode and stock code operation. List of item columns available include:
- Bar Code: When the cursor is in this field, the operator can either type in the barcode details or use the barcode scanner to scan the item barcode. If the barcode matches the barcode of a stocked item, then the item details are retrieved and diaplayed on screen. The item is added to teh list of items being sold and the system moved down one line, in readiness for the next item. If the quantity being sold is more than 1, then the operator can either scan the same repeatidly or enter the quantity in the Qty column.
- Stock Code: Similar to the barcode but using the item’s stock code (SKU).
- Description: Item’s description. If you require more that a single line for the item’s description or want to add some other pertinent details then you can add Comment 1 and Comment 2 columns to the items section.
- Qty: Item quantity being sold – defaults to 1.
- Unit Price: Item’s unit sell price. The system allows up to 4 sell prices to be defined for each item i.e. there are 4 sell price bands. Depending on which price band an exising customer is assigned to, the system will display the appropriate unit sell price.
- Net Amt: For any item that is taxable, this is the item sell price before tax is applied.
- Tax Amt: For any item that is taxable, this is the tax amount that will be added to its sell price.
- Gross Amt: This is the item’s total sell price (net amt + tax amt).
Checking Out Items
To facilitate speedy checkout, a number of features are implemented:
- A/C Ref: Selecting a customer account reference is all that is required to start recording items to be cjecked out. Should you need to change any customer details, simply click into the relevant field with a mouns and make the necessary changes. Any changes made are limited to the current transaction and do not update the customer record.
- Barcodes: As item barcodes are scanned, these are added to the list of items that are being checked out and the system is primed for the next item to be scanned. If another item with the same barcode is scanned, then the system automatically increments the item quantity being checked out.
- Stock Codes: If there is no barcode, item details can be enetered using the item stock code (SKU). The system operated in the same was as for barcode scanning but using stock code entry.
- Qty [F6]: If you wish to update the quantity, for an item, you can either click the designated function key, F6 or click into the qty field with a mouse and enter the desired number.
- Unit Price [F7]: As qty, above with F7 as the designated key.
- Net Amt [F8]: As qty, above with F8 as the designated key.
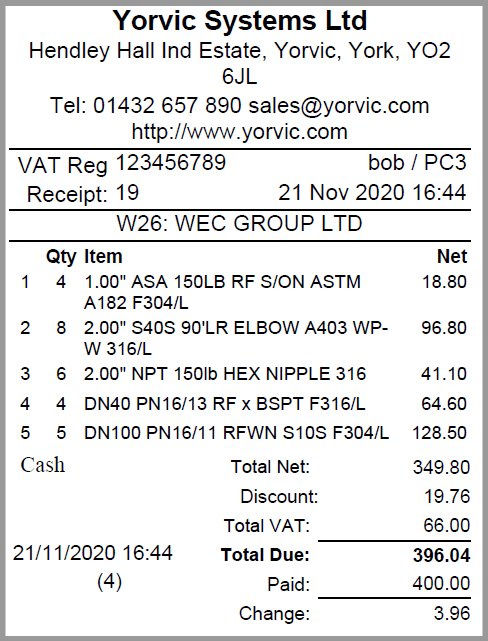
- Cash: If this button is clicked, the focus is set to the amount tendered / paid field to allow the user to enter the amount paid by the customer. Pressing the Enter key in this field, automatically triggers the printing of the till receipt. A sample till receipt is shown below; the actual pritn format may be amended to suit individual needs.
- Credit / Debit Card: If this button is clicked, the system automatically sets the amount tendered to the total amount due.
Example: Till Receipt
Till Sales
This screen allows you to cash up a till, after a shift or at the end of the day. All till sales are recorded in their respective Cash and Credit Card sales nominal codes. At the end of the day or a till shift, the till sales may be cashed up i.e. the money and card receipts transferred from the till to the company master cash and credit card bank nominal codes.
The screen lists all workstations that have been configures as Tills. The Expected columns show the total takings for a given till. All you need do is enter the total cash and credit / debit card receipts in the till in the Actual columns. If there are any differences between the Actual and Expected columns, these will be listed in the Shortages columns. Once you are happy with your data entry, you can click the Post button, on the toolbar to complete the cashing up process. All cash sales, card sales and shortages will be posted to the designated nominal code.
